Monday, April 24, 2017

Cellphone post-it holder


Hi Makers!!! New type of video is here!!!! I'm, here today with this kawaii callphone post-it holder. Actually my idea was a mini cellphone kawaii box, but then i thought that a post-it holder is a good idea, not only for yourself, but also to give it as a gift for another person♥. I'm sure you will like it, because it isn't only cute, but also a fantastic way to....(scroll down for more description♥). So watch the tutorial below and give me cute thumbs up for more upcoming kawaii crafts!!! Let's make that!

πŸ’›πŸ”΅πŸ’šπŸ”΄πŸ’™⚫πŸ’œπŸ”΅πŸ–€πŸ”΄πŸ’›⚫πŸ’šπŸ”΅πŸ’œπŸ”΄πŸ’›
MATERIALS
◼Tools
  • Basic materials
  • Acetate (9 x 9cm)
  • Templates and decors (scroll down for links)
  • Silver metallic pen and black gel pen
  • Corners rounder (10mm)
  • Post it= 8 x 8cm
◼Cardstocks
  • Base= 220gms sky blue= 20,8 x 20,8cm
  • stripes for decors
◼Chipboard
  • White= 9,9 x 14cm
πŸ’›πŸ”΅πŸ’šπŸ”΄πŸ’™⚫πŸ’œπŸ”΅πŸ–€πŸ”΄πŸ’›⚫πŸ’šπŸ”΅πŸ’œπŸ”΄πŸ’›
Decors and base template
(print on A4 size paper= 29,7 x 21cm)


πŸ’›πŸ”΅πŸ’šπŸ”΄πŸ’™⚫πŸ’œπŸ”΅πŸ–€πŸ”΄πŸ’›⚫πŸ’šπŸ”΅πŸ’œπŸ”΄πŸ’›
Watch the video tutorial


πŸ’›πŸ”΅πŸ’šπŸ”΄πŸ’™⚫πŸ’œπŸ”΅πŸ–€πŸ”΄πŸ’›⚫πŸ’š
Watch last video


πŸ’›πŸ”΅πŸ’šπŸ”΄πŸ’™⚫πŸ’œπŸ”΅πŸ–€πŸ”΄πŸ’›⚫πŸ’šπŸ”΅πŸ’œπŸ”΄πŸ’›


This post-it holder is very easy to make. But to make it more easier, i've made 2 templates: 1 for the base and 1 for the decorations that i added.


I decorated them like an apple cellphone, but you can use other type of deco to have other cellphone's brands: ASUS, Samsung, Nokia, .....


To make them such as real cellphones, i added a screen of an iPhone that i downloaded from google and then modified to fit it on my post-it.


Another beautiful thing of this post-it holder is that you can use the acetate to write on it with markers or white board pen.


On the back i also added the apple logo, but you can use other logo or HTMT Logo, that you can cut from the template♥.


♥THANKS FOR VISITING MY WEBSITE!!! I HOPE YOU LIKE THIS TUTORIAL!!! DON'T FORGET TO SUBSCRIBE ON MY YOUTUBE CHANNEL AND THUMBS UP FOR MORE KAWAII VIDEOS. IF YOU HAVE SOME REQUEST, QUESTIONS OR PRIVATE THINGS TO SAY JUST SEND ME AN E-MAIL. BYE AND HAVE A GREAT TIME!!!!♥ 

Thursday, April 13, 2017

Animated bunny box


Hi Makers!!! This week i did a lot of thing and a lot of experiments. Scrolling youtube's videos i saw a beautiful card and it's an animated card. I searched it and i saw a cute animated card, so then i tried it and i thought to make my version of it. In fact for this week's video i'm going to show you how to make this animated bunny card. Let's make that!

πŸŒ»πŸ°πŸŒΌπŸ‡πŸŒ»πŸ°πŸŒΌπŸ‡πŸŒ»πŸ°πŸŒΌπŸ‡πŸŒ»πŸ°πŸŒΌπŸ‡πŸŒ»
Materials
◼TOOLS
  • Basic materials
  • Cutter
  • Liquid glue or stick glue and hot glue
  • Pieces of cardstocks (orange, pink and green)
  • Decorations (banner)
◼CARDSTOCKS
  • Base= 200gms mid pink= 22 x 14cm (fold in half 
  • Layers= 200gms white= 10,5 x 13,5cm (2pcs)
◼DESIGNER PAPER
  • 160gms = 10 x 13cm

πŸŒ»πŸ°πŸŒΌπŸ‡πŸŒ»πŸ°πŸŒΌπŸ‡πŸŒ»πŸ°πŸŒΌπŸ‡πŸŒ»πŸ°πŸŒΌπŸ‡πŸŒ»
Bunny's body and mechanism
(print on A4 size paper= 29,7 x 21cm)


πŸŒ»πŸ°πŸŒΌπŸ‡πŸŒ»πŸ°πŸŒΌπŸ‡πŸŒ»πŸ°πŸŒΌπŸ‡πŸŒ»πŸ°πŸŒΌπŸ‡πŸŒ»
Watch the video tutorial


πŸŒ»πŸ°πŸŒΌπŸ‡πŸŒ»πŸ°πŸŒΌπŸ‡πŸŒ»πŸ°πŸŒΌ
Watch last video


πŸŒ»πŸ°πŸŒΌπŸ‡πŸŒ»πŸ°πŸŒΌπŸ‡πŸŒ»πŸ°πŸŒΌπŸ‡πŸŒ»πŸ°πŸŒΌπŸ‡πŸŒ»


This card is inspired by a video tutorial that i saw on youtube. In fact i also use its template. Soon i think that i will add a new playlist and new type of video that i will probably call "Social test"


When you pull the carrot, the ears of the bunny will open, so when you push the carrot back, they will close


The part of the mechanism is a little bit difficult, so i made a template to make it easy.


THANKS FOR VISITING MY WEBSITE AND I HOPE YOU LIKE IT!!! IF YOU HAVE SOME SUGGESTIONS AND QUESTION, JUST SEND ME AN E-MAIL. SUBSCRIBE AND THUMBS UP FOR MORE VIDEOS EVERY WEEK. BYE!!! HAPPY MAKING!!!

Monday, April 3, 2017

Pyramid bunny box


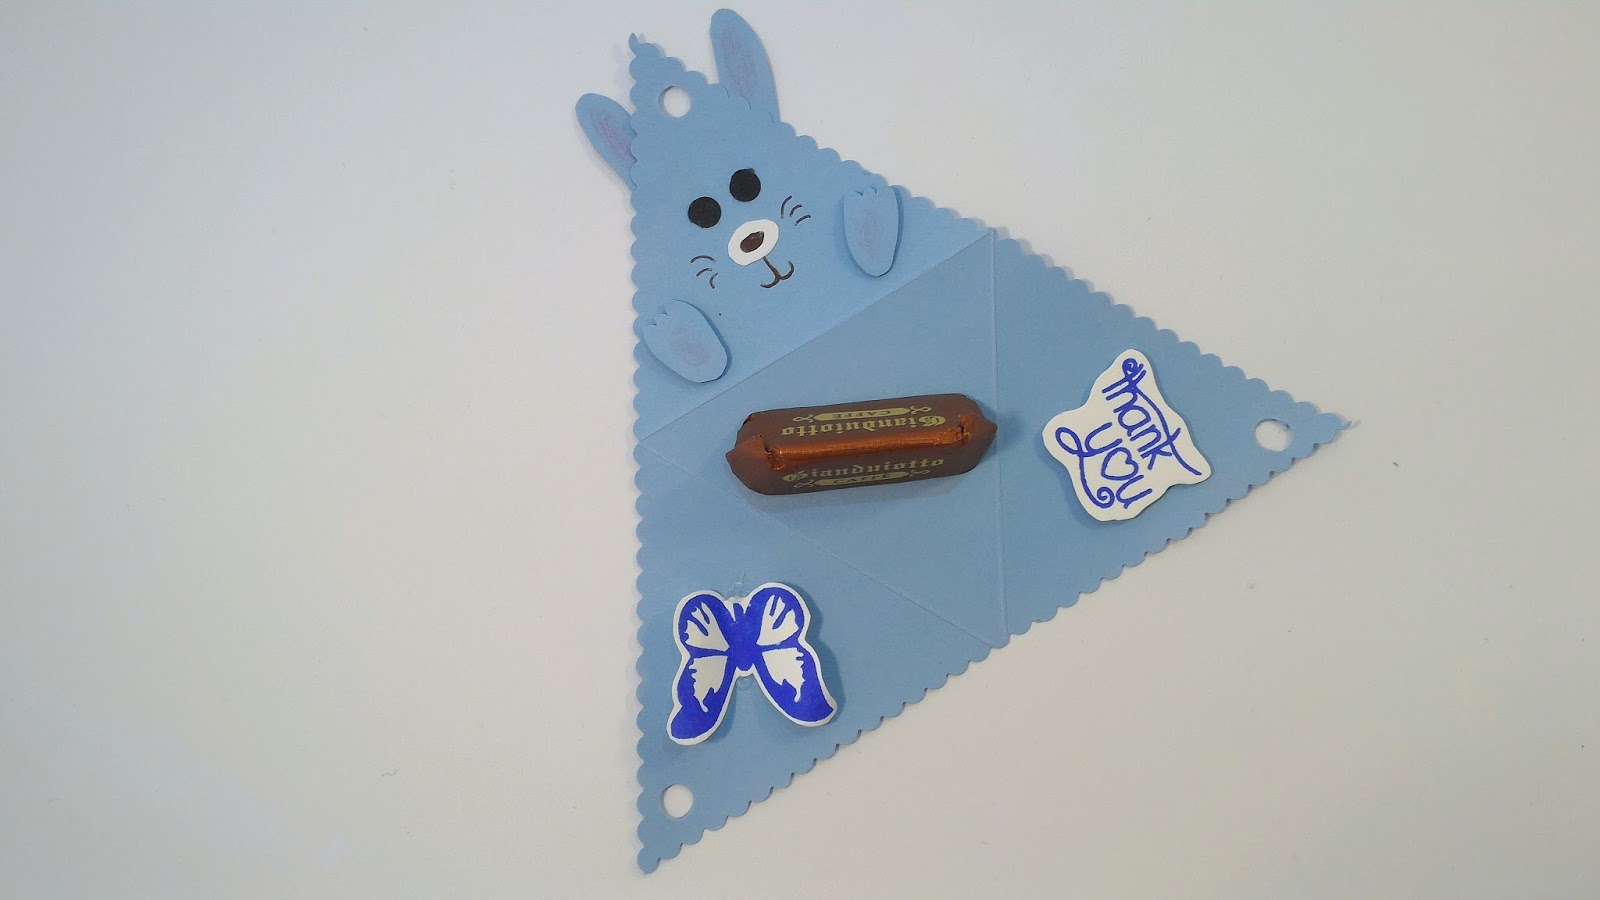
Hi Makers!!! I'm here with a new simple craft and this is a box made with just a triangle cardstock. It's the Pyramid bunny box that you can use to give some sweets to your childern and to others. Let's make that!!!

πŸ«πŸ‡πŸ¦πŸ«πŸ‡πŸ¦πŸ«πŸ‡πŸ¦πŸ«πŸ‡πŸ¦πŸ«πŸ‡πŸ¦πŸ«πŸ‡
Materials
◼TOOLS
  • Basic materials
  • Hole puncher (0,5cm)
  • Cardstocks (sky blue or pink petal rose)
  • Ribbon
  • Decorations (scroll down for info)

πŸ«πŸ‡πŸ¦πŸ«πŸ‡πŸ¦πŸ«πŸ‡πŸ¦πŸ«πŸ‡πŸ¦πŸ«πŸ‡πŸ¦πŸ«πŸ‡
Box template
(Print on A4 size paper= 29,7 x 21cm)


πŸ«πŸ‡πŸ¦πŸ«πŸ‡πŸ¦πŸ«πŸ‡πŸ¦πŸ«πŸ‡πŸ¦πŸ«πŸ‡πŸ¦πŸ«πŸ‡
Watch video tutorial


πŸ«πŸ‡πŸ¦πŸ«πŸ‡πŸ¦πŸ«πŸ‡πŸ¦πŸ«πŸ‡πŸ¦πŸ«πŸ‡πŸ¦πŸ«πŸ‡
Watch last video


πŸ«πŸ‡πŸ¦πŸ«πŸ‡πŸ¦πŸ«πŸ‡πŸ¦πŸ«πŸ‡πŸ¦πŸ«πŸ‡πŸ¦πŸ«πŸ‡


This pyramid is such lovely. One side i decorated like the bunny face. Another side with a "thank you" that i stamped. And on the last one i added a stamped butterfly


As always, i made 2 box, one for girls and ome for boys.


Removing the ribbon, inside ther is the gift and if you want to put a bigger gift, you can double the size of the box.


It's made with only one triangle cardstock


THANKS FOR VISITING MY WEBSITE AND HOPE YOU LIKE IT!! SUBSCRIBE AND THUMBS UP FOR MORE VIDEOS EVERY WEEK!!! IF YOU WANT TO ASK SOMETHING, JUST SEND ME AN E-MAIL. BYE AND HAVE A GREAT TIME!!!

Wednesday, March 22, 2017

Easter hat sweets holder


Hi Makers!!! It's Spring!!!! So let's start this beautiful season with Easter!!! This week i'm going to show you how to make these hats that you can use to decorate or to put in some sweets for Easter. The truth is that this was for St. Patrick Day, but i had some problems so here you are...... It's super easy and it is also the way to recycle the toilet paper roll!!! Let's make that!!!

πŸ€πŸ‡πŸŒΈπŸŒΉπŸ€πŸ‡πŸŒΈπŸŒΉπŸ€πŸ‡πŸŒΈπŸŒΉπŸ€πŸ‡πŸŒΈπŸŒΉπŸ€πŸ‡πŸŒΈπŸŒΉ
MATERIALS
◼TOOLS
  • Basic materials
  • Toilet paper roll (empty)
  • 2 brads
  • An object to make hole (dotter or pencil)
  • Green cardstock
  • Decorations (flowers, twine and cardstocks)


πŸ€πŸ‡πŸŒΈπŸŒΉπŸ€πŸ‡πŸŒΈπŸŒΉπŸ€πŸ‡πŸŒΈπŸŒΉπŸ€πŸ‡πŸŒΈπŸŒΉπŸ€πŸ‡πŸŒΈπŸŒΉ
Watch the video tutorial


πŸ€πŸ‡πŸŒΈπŸŒΉπŸ€πŸ‡πŸŒΈπŸŒΉπŸ€πŸ‡πŸŒΈπŸŒΉπŸ€πŸ‡πŸŒΈπŸŒΉπŸ€πŸ‡πŸŒΈπŸŒΉ
Watch last video


πŸ€πŸ‡πŸŒΈπŸŒΉπŸ€πŸ‡πŸŒΈπŸŒΉπŸ€πŸ‡πŸŒΈπŸŒΉπŸ€πŸ‡πŸŒΈπŸŒΉπŸ€πŸ‡πŸŒΈπŸŒΉ


These hats are made with empty toilet paper roll and on the video tutorial i show you how to make these for any size of the hat.


Removing one brad you can open the box and put inside some sweets or what you want and then close it by putting the brad.


THANKS FOR VISITING MY WEBSITE!!! I HOPE YOU LIKE IT!!! DON'T FORGET TO SUBCRIBE FOR MORE VIDEOS EVERY WEEK AND PUT THUMBS. SHARE THIS TUTORIAL IF YOU LIKE IT TO HAVE MORE MEMBERS!!!! SEE YOU NEXT TIME WITH ANOTHER PROJECT!!! BYE!!!

Sunday, March 12, 2017

Shadow box card


Hi Makers!!! This week... another card!!!! This is a new type of card that i want to show you. Going on Pinterest i found a 3D card like this, so i designed mine and here it is!!!! I'll make sure that this will be very simple. To make your life easier i made a template that you can print down below. Let's make that!!!

🌼🌻🌸🌹🌼🌻🌸🌹🌼🌻🌸🌹🌼🌻🌸🌹🌼
Materials
(TOOLS)
  • Basic materials
  • Corner round punch (optional)
  • Decorations (pre-cut flower, banners and crystals)
(CARDSTOCKS)
  • Base= 220gms petal rose= 27 x 11cm (follow the template down below)
  • A= 200gms white= 10 x 7,5cm
  • B=200gms white= 10 x 8cm
(DESIGNER PAPER)
  • Flower design= 9,5 x 7,5cm


🌼🌻🌸🌹🌼🌻🌸🌹🌼🌻🌸🌹🌼🌻🌸🌹🌼
Base shadow box card template
(Print on an A4 size paper= 29,7 x 21cm)


🌼🌻🌸🌹🌼🌻🌸🌹🌼🌻🌸🌹🌼🌻🌸🌹🌼
Watch the video tutorial


🌼🌻🌸🌹🌼🌻🌸🌹🌼🌻🌸
Watch last video


🌼🌻🌸🌹🌼🌻🌸🌹🌼🌻🌸🌹🌼🌻🌸🌹🌼


This card is super cute. I took an entire day to study how to make it.


As always i tell you the decorations that i added. On the front i added a simple "I LOVE YOU", then a stripe of designer paper and some plastic crystals.


Inside i added a space to write something. I sticked a flower and a simple pre-cut sentence. These two will be 3D, because i attacked them on the shadow box part. So when you open the card the shadow box will pop up. If you want to do only the shadow box i have a tutorial.


AND THAT'S ALL!!! THANKS FOR VISITING MY WEBSITE AND I HOPE YOU LIKED IT!!! FOR REQUEST AND QUESTIONS, JUST SEND ME AN E-MAIL  AND I WILL ANSWER YOU, OR YOU CAN COMMENT DOWN BELOW THE VIDEOS!!! SUBSCRIBE AND THUMBS UP FOR MORE VIDEOS EVERY WEEK!!! HAVE A GREAT TIME, BYE!!!