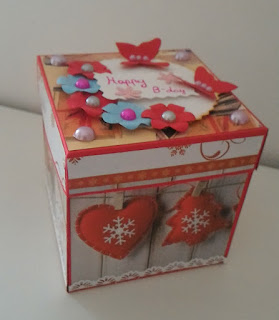
Hi! Have you got some birthday gift's ideas??? I have one!!! Try this beautiful idea....the Birthday Cake Explosion Box. It's a box that when you remove the lid, the box's walls will pop out and the paper cake will be the surprise. So try this amzing and perfect gift for someone!!!
⭐⭐⭐⭐⭐⭐⭐⭐⭐⭐⭐⭐⭐⭐⭐⭐⭐⭐⭐⭐⭐⭐⭐⭐⭐⭐⭐⭐⭐⭐⭐⭐⭐⭐⭐⭐⭐⭐
Materials
- 30 x 30cm red cardstock (for the box) (you can use the color that you prefer)
- 15,2 x 15,2cm red cardstock (for the lid) (you can use the color that you prefer)
- patterned paper
- pencil and eraser
- ruler and cutter or scissor
- glue (stick glue or liquid glue) or double-sided tape (i also use some 3d double-sided tape)
- fold marker (that what we call dotter) and paper folder (these 2 i use to fold easly the paper)
- all the decorations that you prefer (plastic pearls, flowers, butterflies, ...)
⭐⭐⭐⭐⭐⭐⭐⭐⭐⭐⭐⭐⭐⭐⭐⭐⭐⭐⭐⭐⭐⭐⭐⭐⭐⭐⭐⭐⭐⭐⭐⭐⭐⭐⭐⭐⭐⭐
Box template (this template can't be printed, so just copy the mesures on the cardstock)
⭐⭐⭐⭐⭐⭐⭐⭐⭐⭐⭐⭐⭐
Lid template ( print on A4 paper = 29 x 21 cm paper)
⭐⭐⭐⭐⭐⭐⭐⭐⭐⭐⭐⭐⭐
Cake's layer's borders template (print on F4 paper = 33 x 24 cm paper)
⭐⭐⭐⭐⭐⭐⭐⭐⭐⭐⭐⭐⭐
Circles for cake's layers template (print on A4 paper = 29 x 21cm paper)
⭐⭐⭐⭐⭐⭐⭐⭐⭐⭐⭐⭐⭐⭐⭐⭐⭐⭐⭐⭐⭐⭐⭐⭐⭐⭐⭐⭐⭐⭐⭐⭐⭐⭐⭐⭐⭐⭐
watch the video tutorial
the lid is covered with some patterned paper or scrapbook paper. I added a white circle cardstock and on it i added some paper flowers and butterflies. To finish i added a very simple greeting with some 3d double-sided tape
the outside walls are covered with some patterned paper and then i glue a stripe of white cardstock
the inside walls are covered with some patterned paper
on each wall i added a circle cardstock with some words (for example "teenager". If you can see on the other walls i added some italian words because i'll give it this box to my italian cousin) and then i decorated the circles with plastic pearls, flowers and butterflies.
the true surprise is this beautiful and sweet cake. The front is decorated with some sky blue and red flowers and some cutted out green leaves.
each layer is decorated with some punched cardstock stripes as the frosting. The back part is decorated with some mini paper flower to don't leave it "empty" (without decorations)
Thanks for visiting my website!!! i hope you enjoy it!!! New videos are often every sunday or monday but sometimes other day like this tutorial (sorry for posting this tutorial lately) and don't forget to subscribe and thumb up the video!!! BYE!!!


JUST DISCOVERED YOUR VIDEO AS I HAVE BEEN LOOKING FOR A WEEK FOR TEMPLATES COULD YOU EMAIL ME IN INCHES WHAT THE STRIPS AND CIRCLES ARE IN INCHES YOU AFE A GEAT DESIGNER DO YOU HAVE A PRINTOUT FOR THE LITTLE FLOWERS TOO AS WOULD BE WILLING TO BUY AS THAT WAY CAN JSUT PRINT THEM OUT YOU SAID YA CAN DOWNLOAD IT ALL EXCEPT THE BOX RIGHT TRYING TO MAKE A CAKE FOR MY NIECES WEDDING IN JULY THIS CAKE WOULD BE GOOD FOR A TEA LIGHT CAKE HAVE YOU EVER MADE A TEA LIGHT CAKE AS JUST DISCOVERED THAT LAT WEEK ON ONE OF MY CROCHETING SITES ANYWAYS CAN YOU EMAIL ME PLEASE THANKS AGAIN FOR TUTORIAL AND MEASUEMENTS JUST NEED TO KNOW IN INCHES THE CIRCLES AND STRIPS AS WE DONT USE CENTIMIMETERS WE USE INCHES HOPE TO EHAR FORM YOU SOON AS MY NIECE IS GETTING MARRIED IN JULY THE BOX LOOKS DIFFICULT BUT WILL TRY AND COULD YOU ANSWER MY QUESTIONS
ReplyDelete