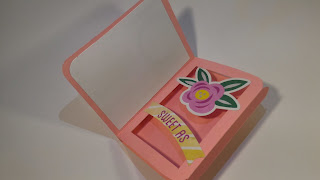
Hi Makers!!! This week... another card!!!! This is a new type of card that i want to show you. Going on Pinterest i found a 3D card like this, so i designed mine and here it is!!!! I'll make sure that this will be very simple. To make your life easier i made a template that you can print down below. Let's make that!!!
🌼🌻🌸🌹🌼🌻🌸🌹🌼🌻🌸🌹🌼🌻🌸🌹🌼
Materials
(TOOLS)
- Basic materials
- Corner round punch (optional)
- Decorations (pre-cut flower, banners and crystals)
- Base= 220gms petal rose= 27 x 11cm (follow the template down below)
- A= 200gms white= 10 x 7,5cm
- B=200gms white= 10 x 8cm
- Flower design= 9,5 x 7,5cm
🌼🌻🌸🌹🌼🌻🌸🌹🌼🌻🌸🌹🌼🌻🌸🌹🌼
Base shadow box card template
(Print on an A4 size paper= 29,7 x 21cm)
🌼🌻🌸🌹🌼🌻🌸🌹🌼🌻🌸🌹🌼🌻🌸🌹🌼
Watch the video tutorial
🌼🌻🌸🌹🌼🌻🌸🌹🌼🌻🌸
Watch last video
🌼🌻🌸🌹🌼🌻🌸🌹🌼🌻🌸🌹🌼🌻🌸🌹🌼
This card is super cute. I took an entire day to study how to make it.
As always i tell you the decorations that i added. On the front i added a simple "I LOVE YOU", then a stripe of designer paper and some plastic crystals.
Inside i added a space to write something. I sticked a flower and a simple pre-cut sentence. These two will be 3D, because i attacked them on the shadow box part. So when you open the card the shadow box will pop up. If you want to do only the shadow box i have a tutorial.
AND THAT'S ALL!!! THANKS FOR VISITING MY WEBSITE AND I HOPE YOU LIKED IT!!! FOR REQUEST AND QUESTIONS, JUST SEND ME AN E-MAIL AND I WILL ANSWER YOU, OR YOU CAN COMMENT DOWN BELOW THE VIDEOS!!! SUBSCRIBE AND THUMBS UP FOR MORE VIDEOS EVERY WEEK!!! HAVE A GREAT TIME, BYE!!!


No comments:
Post a Comment