Saturday, August 17, 2019

Circle Cutter REVIEW + 3 Fruity Cards TUTORIAL


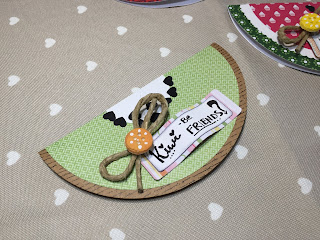
Hello Makers  !!! Today I want show you a gadget or an object that I bought last year and that I haven't used so much. It is a CIRCLE CUTTER I used to make 3 fruity cards. Down below the video you'll see the written review I made with some opinions, but you can also see it on the video. Then I've also made a tutorial on these 3 cards just to show you what you can do with this special cutter. I hope to create other things with this. so what are you waiting for??? Scrool down to see How To Make That!!!

⭐❄πŸ’œ❄⭐❄πŸ’™❄⭐❄πŸ’œ❄⭐❄πŸ’™❄⭐❄πŸ’œ❄⭐❄
MATERIALS
Here are some materials I've used to make this 3 cards
# Watermelon
  • Red designer paper's diameter= 12,5cm
  • White cardstock diameter= 14cm (cut with decorative scissors)
  • Green designer paper's diameter= 16cm
# Kiwi
  • White cardstock's diameter= 5cm
  • Green designer paper's diameter= 14cm
  • Brown designer paper's diameter= 15cm
# Apple
  • White cardstock's diameter= 15cm
  • Red designer paper's diameter= 16cm
⭐❄πŸ’œ❄⭐❄πŸ’™❄⭐❄πŸ’œ❄⭐❄πŸ’™❄⭐❄πŸ’œ❄⭐❄

Watch the video tutorial and the review


⭐❄πŸ’œ❄⭐❄πŸ’™❄⭐❄πŸ’œ❄⭐❄πŸ’™❄⭐❄πŸ’œ❄⭐❄


So here is the circle cutter I bought from Lidl a year ago and I've used it just 3 times. It cost me 10 euros. It has a center part which is the center of rotation and when you use this you have to press on that violet part and hold it: it mustn't move otherwise your circle won't be perfect.


The long piece of this cutter is a ruler which has centimeters and inches, so you can choose what you are comfortable using. On the top of it is an indicator you have to rotate to unlock. Then you can choose the size you desire: you have to pay attention because it indicates the diameter of the circle and NOT THE RADIUS. Finally rotate the indicator again to lock it.


When you turn this gadget, underneath the indicator is the blade. You have to remove the protective cover first and then you'll see the mini blade on it: it's very sharp so you have to pay attention.


If the blade isn't so sharp anymore, you can change it using the others underneath the center of rotation. There's a mini storage, which is the violet one, and there are3 or 5 extra blades (I'm sorry I don't remember the exact number of it).


So with this gadget I've made for you 3 easy and simple summer cards. They are 3 kind of fruits: an apple, a watermelon and a kiwi; but obviously you can make other ones like an orange or a slice of lemon.


As you can see I've also added soma paper seeds and some decorations like a banner, a bow and a DIY button just to add some colors on it.


THANKS FOR VISITING MY WEBSITE!!! HOPE YOU LIKE IT!!! DON'T FORGET TO HIT THUMBS UP AND SUBSCRIBE FOR MORE BLOGS AND VIDEO TUTORIAL EVERY WEEK. SHARE MY VIDEOS TO HAVE MORE MEMBERS. SEE U NEXT TIME, BYE ❤


Thursday, July 11, 2019

Photo Box Container


Hello Makers!! How's the day? I hope it's everything fine! Well I actually didn't know what to do: a box or an album....and so I've combined the two ideas and I've decided to make a very easy and common box that acts as a container for your photos. There's an accordion inside where you can easily stick memories...but obviously you can use this box also as a normal gift box. I also suggest you to put some chocolates or candies. What are you waiting for??? scroll down to see How To Make That!!!

πŸ’™πŸ“ΈπŸ’›πŸ“·πŸ’šπŸ“ΈπŸ’œπŸ“·πŸ’™πŸ“ΈπŸ’›πŸ“·πŸ’šπŸ“ΈπŸ’œπŸ“·πŸ’™
MATERIALS
TOOLS
  • Basic materials (pencil, eraser, glue, bone folder, dotter,...)
  • Glue gun and hot glue sticks
  • Decorative border puncher and decorative scissors
  • Ribbon
  • Decoration Elements (DIY paper flowers, banner, DIY paper leaves, bow, mini paper hearts)

CARDSTOCK (I'm using 220 gsm cardstock)
  • Base= white= 42,5 x 12,5cm (fold on long side every 10cm and fold on short side @ 2,5cm)
  • Lid= light blue or sky blue= 15,2 x 15,2cm (fold on each side @2,5cm)
  • Box's bottom= white= 10 x 10cm
  • Accordion 1st piece= yellow= 29 x 9cm
  • Accordion 2nd piece= yellow= 27 x 9cm
DESIGNER PAPERS (I'm using the 200 gsm type of 3 collections)
  • Base= 9,5 x 9,5cm (4pcs)
  • Box's low edges= 10,2 x 3,5cm (4pcs) (decorated edge)
  • Lid top= 9,5 x 9,5cm (decorated edges)
  • Lid sides= 10 x 2cm (4pcs)
  • Accordion or Album= 8,5 x 8,5cm (6pcs)
πŸ’™πŸ“ΈπŸ’›πŸ“·πŸ’šπŸ“ΈπŸ’œπŸ“·πŸ’™πŸ“ΈπŸ’›πŸ“·πŸ’šπŸ“ΈπŸ’œπŸ“·πŸ’™
Watch the video tutorial


πŸ’™πŸ“ΈπŸ’›πŸ“·πŸ’šπŸ“ΈπŸ’œπŸ“·πŸ’™πŸ“ΈπŸ’›πŸ“·πŸ’šπŸ“ΈπŸ’œπŸ“·πŸ’™

I bet you've already seen this type of creation, because it's not a new idea....but I've created it because I wanted to try it to see if it's a nice idea to give as a gift to my mother. So I just want to say that it's not my own original creation but an inspired one from other tutorials.


Anyway as you can see it's a normal box, but the best thing about it is the way I've created the base: I began with a rectangle piece of cardstock instead of a square one. The lid is also easy but rich of decorations. While the album inside is an accordion and it's removable: you can also use this box as a chocolate container instead.


The lid looks to be decorated too much...but the truth is that I've used just simple decorations and rich colors in order to have a nice looking box with just a little.


THANKS FOR VISITING MY WEBSITE!!! HOPE YOU LIKE IT!!! DON'T FORGET TO HIT THUMBS UP AND SUBSCRIBE FOR MORE BLOGS AND VIDEO TUTORIAL EVERY WEEK. SHARE MY VIDEOS TO HAVE MORE MEMBERS. SEE U NEXT TIME, BYE ❤


Thursday, March 14, 2019

3 Types of Floral Cards


Hey Makers!!! How's your day?? I hope it's good !! Today I want to show you how to make 3 very easy floral cards that I did for valentine's day and mothers' day! Scroll down for the video and for more informations!!!

πŸ’›πŸ§πŸ¦πŸ’œπŸ¨πŸ’™πŸ§πŸ’šπŸ¦πŸ’›πŸ¨πŸ’œπŸ§πŸ’™πŸ¦πŸ’šπŸ¨πŸ’œ
MATERIALS
# 1st Card - "Uncovered Corner"
  • Basic materials (pencil, glue, bone folder, dotter, ruler, glue gun, ...)
  • Base cardstock= 200gsm Royal Blue= 24 x 16cm (fold in half)
  • Background cardstock= 200gsm White= 11 x 15cm (2pcs)
  • Designer paper= 11 x 15cm
  • Paper flowers
  • A piece of decorated jute
  • Jute twine
  • Other decorations
# 2st Card - "Half a Floral Card"
  • Base cardstock= 200gsm Cream= 22 x 16cm (fold in half)
  • Background cardstock= 200gsm white= 10 x 15cm (2pcs)
  • Designer paper= 6 x 10cm
  • Stamped and cut flowers
  • Stamped sentiments on a cut banner
  • A piece of decorated jute
  • Jute twine
# 3rd Card - "Window Card"
  • Base cardstock= 200gsm Red= 12 x 22cm (fold @ 6cm)
  • Cardstock B= 200gsm Red= 5 x 12cm
  • Cardstock C= 200gsm Red= 8 x 5cm
  • White cardstock for the C= 7,5 x 4,5cm
  • Background cardstock= 200gsm White= 15 x 11cm
  • Designer paper small= 4 x 11cm
  • Designer paper small= 5 x 11cm
  • A piece of Acetate
  • Flower and stamps
  • Sentiments
πŸ’›πŸ§πŸ¦πŸ’œπŸ¨πŸ’™πŸ§πŸ’šπŸ¦πŸ’›πŸ¨πŸ’œπŸ§πŸ’™πŸ¦πŸ’šπŸ¨πŸ’œ

Watch the video tutorial


πŸ’›πŸ§πŸ¦πŸ’œπŸ¨πŸ’™πŸ§πŸ’šπŸ¦πŸ’›πŸ¨πŸ’œπŸ§πŸ’™πŸ¦πŸ’šπŸ¨πŸ’œ


These cards are very easy to make: they take you just 5 minutes each!!! I made 3 of them to show you different types of floral card and in fact i've used 3 techniques to make them!!!


The first one is this "Uncovered Corner". It is a normal leveled card, but as you can see a corner of the designer paper is folded out. To embellish it I've added 2 handmade colored flowers (tell me if you want the tutorial of them!!!)


The second one is very simple, but also very elegant!! It's a cream folded cardstock with a piece of designer paper on it, filled with paper stamped flowers on the edge. It's also embellished with sentiments and a piece of jute!


The last one is this unsual card. It seems to be an "opened" card, but it's really covered with a transparent acetate!!! On the blank space of it you can write everything and you can decorate it on your way! I think it's the "hardest" among them to make!


THANKS FOR VISITING MY WEBSITE!!! HOPE YOU LIKE IT!!! DON'T FORGET TO HIT THUMBS UP AND SUBSCRIBE FOR MORE BLOGS AND VIDEO TUTORIAL EVERY WEEK. SHARE MY VIDEOS TO HAVE MORE MEMBERS. SEE U NEXT TIME, BYE ❤


Friday, January 25, 2019

Pencil Binder Album


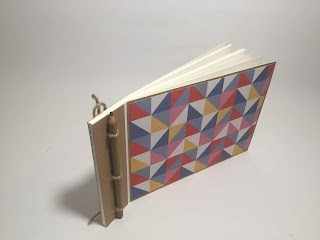
Hello Makers!!! Welcome to How To Make That!!! Today I want to show you how to make a simple and easy, but very elegant album. It is a white paged album with a very particular binding: it's bound with a pencil and twine!!! Then I've also used recycled cereal box to make its cover.
So what are you waiting for??? Scroll down to see How To Make That!!!

⭐❄πŸ’œ❄⭐❄πŸ’™❄⭐❄πŸ’œ❄⭐❄πŸ’™❄⭐❄πŸ’œ❄⭐❄
MATERIALS
TOOLS
  • Basic materials (pencil, eraser, glue, bone folder, dotter,...)
  • Paper hole puncher
  • Jute twine
  • a pencil (15cm long)
  • Designer paper: 19 x 14cm (2pcs)
COVER
  • Recycled cereal box: BASE= 20 x 15cm (2pcs) // SPINE= 15 x 4cm (2pcs)
  • White chipboard: BASE= 20 x 15cm (2pcs) // SPINE= 15 x 4cm (2pcs)
CARDSTOCKS
  • Pages= 20 x 15cm (10pcs)
  • Link= 15 x 4cm (2pcs) (fold in half)
⭐❄πŸ’œ❄⭐❄πŸ’™❄⭐❄πŸ’œ❄⭐❄πŸ’™❄⭐❄πŸ’œ❄⭐❄


⭐❄πŸ’œ❄⭐❄πŸ’™❄⭐❄πŸ’œ❄⭐❄πŸ’™❄⭐❄πŸ’œ❄⭐❄


As you can see this album's binding type is really strange, but very easy. In fact I used a pencil as the binder, but those pieces of twine are the real binder of this album. So why the pencil??? This is because it is used as a 'lock' for the twine.


The pages are simply white and this is what I really want, because I use this album to stick on it simple photos without decorating it. It is a kind more elegant I think!


THANKS FOR VISITING MY WEBSITE!!! HOPE YOU LIKE IT!!! DON'T FORGET TO HIT THUMBS UP AND SUBSCRIBE FOR MORE BLOGS AND VIDEO TUTORIAL EVERY WEEK. SHARE MY VIDEOS TO HAVE MORE MEMBERS. SEE U NEXT TIME, BYE ❤