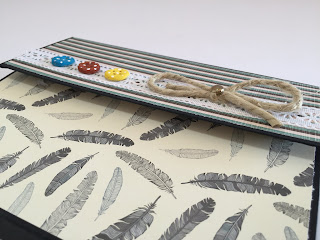
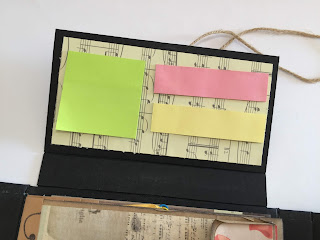
Hi Makers! Welcome to How To Make That!!! For this week I want to show you how to make this travel book organizer, also known as a Folder Organizer. I was actually planning this project for long time, but I didn't have time, that's why I made it just a couple weeks ago. This isn't actually my very original creation, because It's inspired by a tutorial that I've seen on youtube and by the other project on Pinterest. Anyway this folder is super useful and to make it I've also used recycled materials. So what are you waiting for??? Scroll down for the video, materials and more infos!!!
(p.s this is my first time to make a tutorial divided into 2 video, because this project has a lot of techniques in it, so it wasn't so conincing to make just a video. That's why I will post the 2nd part next week, thanks)
🍦💜🍨💙🍧💚🍦💛🍨💜🍧💙🍦💚🍨💛🍧💜
MATERIALS
TOOLS
- Basic materials (pencil, eraser, scissors, cutter, dotter, bone folder, ruler, tapes, hot glue and liquid glue)
- Velcro
- Twine
- Sticky notes or Post-it
- Decorations ( DIY buttons, decorated ribbon, bow,....)
- Black stamp pad and clear stamps
- Bought Envelopes or DIY Envelopes (scroll down for the measurements for the DIY Envelopes)
CHIPBOARDS (2mm Thickness)
- A= 21 x 16cm
- B=21 x 14cm
- C= 21 x 8cm
- D= 8 x 15cm
- E= 9 x 15cm
- F= 2 x 21cm (2pcs)
- G= 2 x 15cm (2pcs)
PAPERS (I use Canson's cardstock, so the name of the cardstocks are from Canson)
- Body outside cover= 220gsm Black= 47 x 25cm
- Body inside cover= 220gsm Black= 41 x 20cm
- Cover D inside= 220gsm Black= 10,3 x 15cm
- Cover D outside= 220gsm Black= 13 x 15cm
- Cover E inside= 220gsm Black= 11,3 x 15cm
- Cover E outside= 220gsm Black= 14 x 15cm
- Binding 1st= Light brown= 8 x 20cm (score on short side @ 6,5 / 5,5cm)
- Binding 2nd= Light brown= 8 x 20cm (score on short side @ 5,5 / 4,5cm)
- Binding 3rd= Light brown= 8 x 20cm (score on short side @ 4,5 / 3,5cm)
ENVELOPES
- Envelope #1= Black= 21 x 26cm (score on long side @ 3 / 15,5cm)
- Envelope #2= Recycled paper= 19,5 x 33cm (4pcs) (score on long side @ 4 / 19cm)
- Envelope #3= Recycled paper= 14 x 21cm (4pcs) (score on long side @ 9 / 18,5cm)
- Link A= Black= 10,5 x 4cm (2pcs) (fold in half)
- Link B= Black= 21 x 4cm (2pcs) (fold in half)
- Link C= recycled paper= 4 x 14cm (8pcs) (fold in half)
- Link D= recycled paper= 4 x 9cm (8pcs) (fold in half)
- Closure for the envelope #1= Black= 14 x 3cm (score on long side @ 3,5cm)
DESIGNER PAPERS
- A= 20 x 14cm
- B= 20 x 13cm
- C= 20 x 7cm
- D= 7 x 14cm
- E= 8 x 14cm
- D outside= 7,5 x 14,5cm
- E outside= 8,5 x 14,5cm
- B outside= 20,5 x 13,5cm
- C outside= 20,5 x 7,5cm
- Envelope #1 front= 20 x 9,5cm
- Envelope #1 back= 20 x 11,5cm
- Envelope #1 flap= 20 x 2,5cm
- Closure for the envelope #1= 10 x 2,5cm
- Envelope #2 front= 19 x 13,5cm (4pcs)
- Envelope #2 back= 14 x 19cm (4pcs)
- Envelope #2 flap= 19 x 3,5cm (4pcs)
- Envelope #3 front= 13,5 x 8,5cm (4pcs)
- Envelope #3 back= 9 x 13,5cm (4pcs)
- Envelope #3 flap= 2 x 13,5cm (4pcs)
- Corner pocket Big= 14 x 13cm
- Corner pocket Small= 13,5 x 12cm (2pcs)
- Pocket #1= 8 x 11cm (2pcs)
- Pocket #2= 8 x 7cm
Travel book organizer base template
("NOT PRINTABLE" means that this template is used just as an instruction)
Here are the templates for the corner pockets and normal pockets
(they are printable by using an A4 size paper= 21 x 29,7cm)

💛🍧🍦💜🍨💙🍧💚🍦💛🍨💜🍧💙🍦💚🍨💜
Watch the video tutorial
PART 1
💛🍧🍦💜🍨💙🍧💚🍦💛🍨💜🍧💙🍦💚🍨💜
PART 2
💛🍧🍦💜🍨💙🍧💚🍦💛🍨💜🍧💙🍦💚🍨💜
Finally after a month of vacation, I come back with another cool project. It is a book or folder for your documents. It is super useful for everything, like travelling, going to work or just at home, so you know where your documents are in case of emergency. This project is not really mine, because it's insipired by some creations I've seen on youtube and pinterest.
The exterior part is very simple: I've decorated it with just 2 designer papers, some DIY buttons, a ribbon and a bow and that's all. I wanted it to be just like that because It looks more professional than a super decorated one. That's why I've also chosen the color Black as the main color.
As closure I chose to use the velcro one, because it is the easiest. But obviously you can also use magnet or other closure instead.
Here is the inside: it has a main part, the central one, which has another type of closure and in this video I will also show you this technique: the string tie closure. Anyway, the other part, that one on the left, is an envelope, but there's more...
So let's start with the first part: the envelope part. Well it's a simple envelope made with cardstock, but you can see it has a velcro closure. Infact opening that closure you can actually have another page where you can put pockets for tags, credit card or other small documents or important things.
Another section is this one here: the sticky notes one. It is really a good idea to put sticky notes in this folder organizer, because in this way you can write down something important about your documents
The other small section is this one. It's just an extra pocket I added for more space for cards and other small things.
So, here is the main part: the envelopes section. As you can see the envelopes are actually inside this kind of "door" and I made it by using another type of closure,which is very simple, but It gives a professional look to this folder: the string tie closure. It is a kind of closure made by a string,2 brads and 2 simple circles. In this video I will show you this technique, so pay attention.
Well, passing by this string tie closure, you'll have the main part where you can put most of your documents. There are envelopes and more other pockets.But guess what...these envelopes are handmade and I used recycled paper bag to make them...and I think that the result is better thann using cardstock...
Some of these envelopes has also this closure...
But some of the other has a normal closure...using obviously a paper clip
The binding that I've used is new too....so I think it's another technique that you can learn from this video...because it's not an ordinary binding, but don't worry because it's very easy and simple...
As you can see there are also other corner pockets for more space, but it's obviuos that you can expand it by making it bigger so can also put there some A4 size documents and big folders. So I think that's all for now and I hope that I inspired you to create your version.
THANKS FOR VISITING MY WEBSITE!!! HOPE YOU LIKE IT!!! DON'T FORGET TO HIT THUMBS UP AND SUBSCRIBE FOR MORE BLOGS AND VIDEO TUTORIAL EVERY WEEK. SHARE MY VIDEOS TO HAVE MORE MEMBERS. SEE U NEXT TIME, BYE ❤
Facebook page: https://www.facebook.com/HowToMakeThatMakers
Youtube channel: https://www.youtube.com/channel/UCrEdF1kGDXpxMDYBtNTAS-g
Website: http://howtomakethatweb.blogspot.it/


